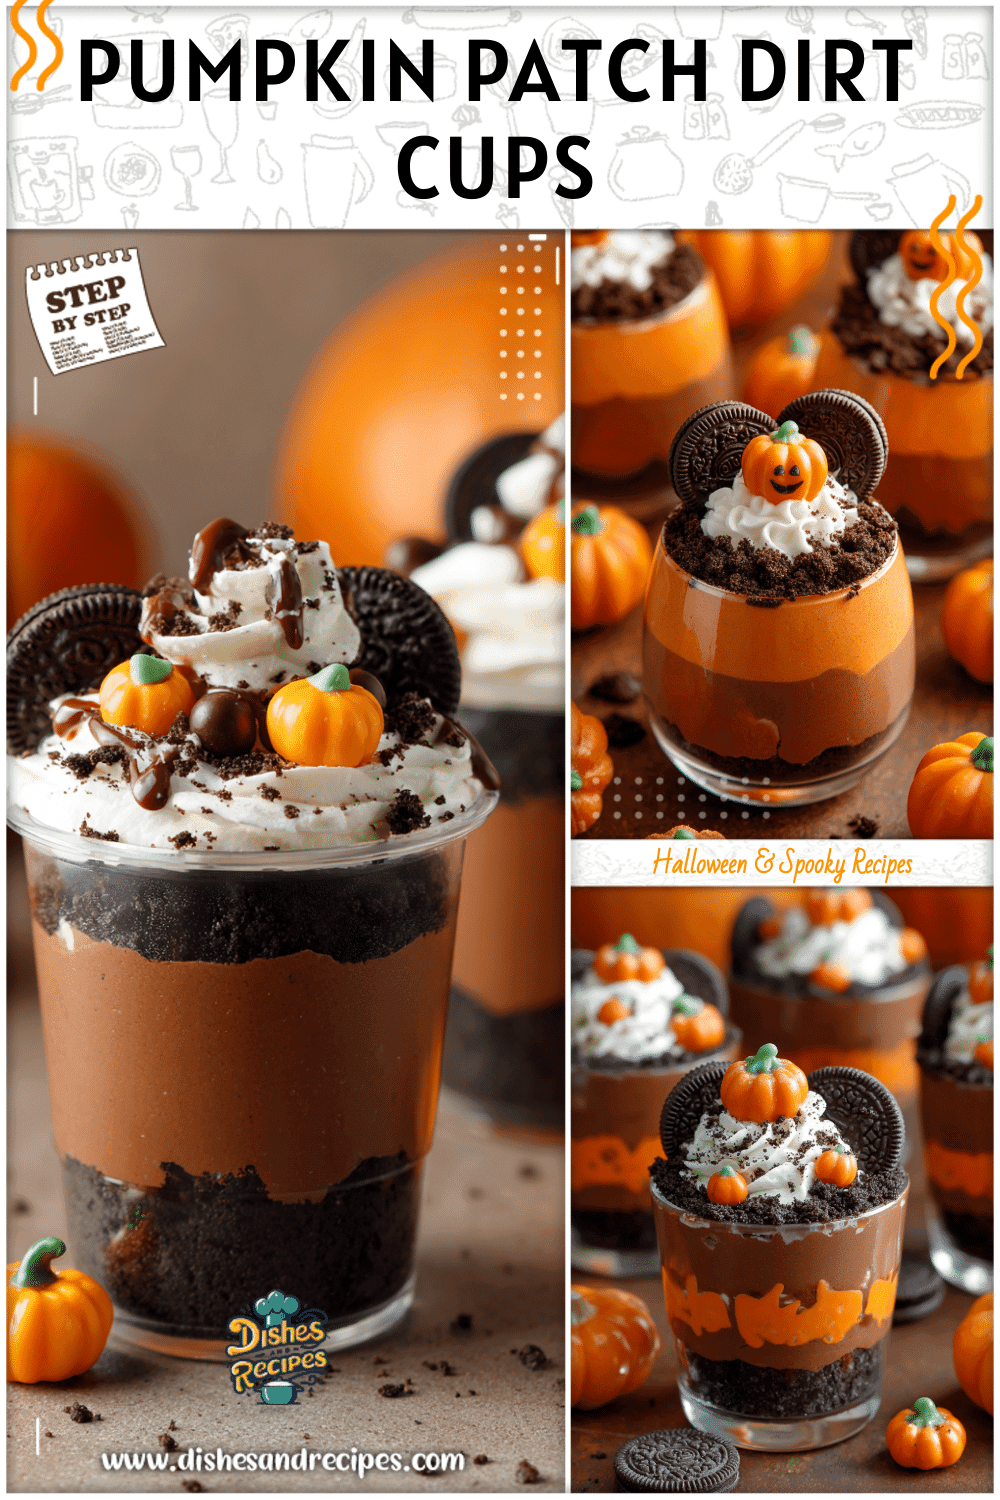
Looking for a Halloween dessert that’s spooky, sweet, and simple to make? Dirt Pudding “Graveyard” Cups are the perfect treat for kids and parents alike. This Dirt Pudding Recipe combines layers of creamy chocolate pudding, crushed cookies, and playful toppings like gummy worms and cookie tombstones for an edible Halloween scene. These Halloween Dirt Cups for Kids aren’t just delicious—they’re a fun hands-on activity that sparks creativity and laughter. Whether for a party, a classroom celebration, or a cozy afternoon in the kitchen, Pudding Dirt Cups make it easy to add some deliciously creepy fun to your Halloween festivities.

The Story Behind Dirt Pudding “Graveyard” Cups – Childhood Fun and Sweet Memories
A Family Tradition with a Spooky Twist
Some of my favorite Halloween memories aren’t from big parties or elaborate costumes—they’re from our kitchen table, where my mom helped us make Dirt Pudding “Graveyard” Cups every October. The kitchen would fill with the scent of crushed chocolate cookies; my siblings and I took turns crumbling them into “dirt” while trying not to snack on too many. Each time we layered the pudding and crumbs, the excitement grew. Soon, our glasses transformed into tiny cemeteries, complete with cookie tombstones, gummy worms creeping through the “soil,” and candy pumpkins lining the paths.
Those Dirt Pudding “Graveyard” Cups weren’t just desserts—they were edible stories we built together. I remember carefully etching funny names into the cookie tombstones with icing, giggling over the idea that this chocolatey graveyard was almost too spooky (and too tasty) to eat. Making Dirt Pudding “Graveyard” Cups became our family’s way of welcoming Halloween—fun, slightly messy, and full of creative energy.
Even now, when I make these spooky pudding dirt cups with my own kids, that same magic comes rushing back. It’s amazing how a simple recipe can hold decades of memories. Dirt Pudding “Graveyard” Cups are more than just chocolate and cookies—they’re little time machines that remind us how traditions can bring families together year after year.
Print
Dirt Pudding “Graveyard” Cups
- Total Time: 25 minutes
- Yield: 8-10 cups 1x
Description
Dirt Pudding “Graveyard” Cups are a fun, spooky no-bake Halloween dessert combining layers of chocolate pudding, crushed cookies, and playful toppings like gummy worms and cookie tombstones. This easy recipe makes 8–10 cups of edible graveyards perfect for parties or classroom treats.
Ingredients
Instructions
1. Whisk pudding mix and cold milk until smooth and refrigerate for at least five minutes
2. Beat softened cream cheese butter and powdered sugar until fluffy then fold in whipped topping
3. Crush chocolate sandwich cookies into fine and coarse crumbs
4. Place a layer of cookie crumbs in the bottom of each cup
5. Spoon a layer of chilled pudding over the crumbs
6. Add a layer of cream cheese mixture over the pudding
7. Repeat layers ending with a final layer of cookie crumbs
8. Decorate each cup with cookie tombstones gummy worms and candy pumpkins
- Prep Time: 20 minutes
- Cook Time: 5 minutes
- Category: dessert
- Method: no bake
- Cuisine: american
Nutrition
- Serving Size: 1 cup
- Calories: 250
- Sugar: 30
- Sodium: 150
- Fat: 9
- Saturated Fat: 5
- Unsaturated Fat: 3
- Trans Fat: 0
- Carbohydrates: 40
- Fiber: 1
- Protein: 3
- Cholesterol: 25
Keywords: dirt pudding, graveyard cups, halloween dessert, pudding dirt cups, halloween dirt cups, no bake dessert
Why Kids Love These Halloween Dirt Cups
The joy of making Halloween Dirt Cups for Kids lies in the perfect mix of imagination and dessert. Kids love that they can play the role of both chef and artist. As they decorate their pudding dirt cups with wiggly gummy worms, candy ghosts, or skeleton bones, their creativity shines. Each cup can become a scary cemetery, a silly monster garden, or a haunted forest—there’s no wrong way to decorate.
What makes this Easy Dirt Pudding Recipe especially popular with parents is how stress-free it is. No baking, no special kitchen tools—just pudding, cookies, and a few colorful candies. It’s an activity that keeps little hands busy and creates minimal mess. The entire process feels more like a craft project than cooking, and at the end, everyone gets a personal cup of chocolatey goodness to enjoy.
Whether they’re served in clear plastic cups at a Halloween party or lined up on a classroom treat table, these Halloween Dirt Cups for Kids are always a hit. They’re playful, practical, and pure Halloween happiness. And the best part? Watching kids proudly show off their spooky creations before devouring every last crumb.
How to Make Dirt Pudding “Graveyard” Cups – The Step-by-Step Easy Dirt Pudding Recipe
Ingredients You’ll Need
Before you begin creating your spooky masterpiece, gather all your ingredients so the process runs smoothly. The best part of this Easy Dirt Pudding Recipe is that you’ll only need a few everyday items and some fun Halloween toppings to bring your “graveyard” to life. Here’s a simple list to help you organize everything you need for your Chocolate Pudding Dirt Cups:
| Ingredient | Amount | Purpose / Notes |
|---|---|---|
| Chocolate sandwich cookies (like Oreos) | 1 package (about 14 oz) | Crushed to create the “dirt” layer |
| Instant chocolate pudding mix | 2 boxes (3.9 oz each) | The creamy chocolate base |
| Cold milk | 3 ½ cups | For mixing with the instant pudding |
| Cream cheese (softened) | 1 package (8 oz) | Adds richness and texture |
| Whipped topping (like Cool Whip) | 1 container (8 oz) | Lightens the pudding filling |
| Butter (softened) | 4 tbsp | For blending with cream cheese and sugar |
| Powdered sugar | ½ cup | Sweetens the cream cheese layer |
| Gummy worms | As desired | For a creepy-crawly graveyard touch |
| Cookie tombstones (e.g., Milano or rectangular cookies) | 6–8 cookies | Decorate with icing names or RIP messages |
| Candy pumpkins or candy bones | A handful | Optional toppings for extra Halloween fun |
| Clear plastic cups or parfait glasses | 8–10 cups | To build and serve your Pudding Dirt Cups |
You can customize your Chocolate Pudding Dirt Cups by trying vanilla or white chocolate pudding for a different look or swapping the regular cookies for golden ones to make a “haunted sand” version. The flexibility of this Dirt Pudding Recipe means you can adjust ingredients to fit dietary needs—dairy-free pudding and whipped topping work perfectly too!
Step-by-Step Directions for the Perfect Graveyard Look
Now that you’ve got all your spooky supplies ready, it’s time to build your tasty graveyard scene! Follow these step-by-step directions to craft Dirt Pudding “Graveyard” Cups that are both adorable and delicious.
Step 1: Prepare the Chocolate Pudding
In a large mixing bowl, whisk together the instant pudding mix and cold milk until smooth and thick. Mix for about two minutes so the pudding sets properly. Place the bowl in the refrigerator for at least five minutes to chill while you prepare the next layer.
Step 2: Make the Creamy Filling Layer
In a separate bowl, beat softened cream cheese, softened butter, and powdered sugar until fluffy and smooth. Fold in the whipped topping gently—it should have a light, airy texture. This creamy blend adds luxurious richness that balances the crunchy cookie crumbs and smooth pudding beautifully.
Step 3: Crush the Cookies into “Dirt”
Place the chocolate sandwich cookies in a resealable plastic bag, then crush them using a rolling pin or food processor. For the best Pudding Dirt Cups, aim for a mix of crumbs and small pieces—they add fun texture and look just like real soil!
Step 4: Assemble Your “Graveyard” Cups
Start with a spoonful of crushed cookies at the bottom of each cup. Add a generous portion of the pudding mixture, then a layer of the cream cheese filling. Continue alternating until the cups are nearly full, ending with a thick cookie crumb “dirt” layer on top.
Step 5: Decorate the Graveyard Scene
Insert a cookie tombstone so that it stands upright in the “soil.” Add icing “RIP” messages, gummy worms, candy pumpkins, or candy bones for fun, frightful touches. Kids will love decorating their own Halloween Dirt Cups for Kids, so let them take creative control!
- Prevent soggy cookie layers: Make sure your pudding is thick before layering.
- Make ahead: Assemble the cups a day in advance; store covered in the fridge.
- Storage: Keep leftover Dirt Pudding “Graveyard” Cups refrigerated for up to three days.
Creating these Easy Dirt Pudding Cups is equal parts recipe and edible craft. Whether you make them as Halloween Oreo Desserts for parties or snacks, they never fail to bring smiles (and a few pretend shivers). This Dirt Pudding Recipe truly captures that perfect blend of spooky fun and sweetness.
Creative Halloween Dirt Cup Ideas and Serving Tips
Fun Decorating Ideas for Pudding Dirt Cups
The best part about making Dirt Pudding “Graveyard” Cups is that decorating them can be just as fun as eating them. For a classic look, start with crushed cookies to form the “soil.” Then add cookie tombstones—rectangular sandwich cookies or oval-shaped biscuits work perfectly. Write “RIP” or ghostly names on them with icing for an authentic cemetery style.
For an extra spooky touch, include Halloween Oreo Desserts like cookie bats or crumbled “dirt” piles. Candy ghosts made from marshmallows, white chocolate-dipped pretzels that resemble bones, or skeleton-shaped candies are perfect for bringing your spooky pudding scenes to life.
If you’re making these Easy Dirt Pudding Cups for a classroom Halloween party, try personalizing each one with name tags or icing names on the cookie tombstones. For flavor variety, mix up the puddings—vanilla, butterscotch, or even mint for a ghostly green tint. Add chocolate syrup for “cemetery paths” or green-colored coconut for mossy texture. Each cup becomes a mini edible haunted landscape!
Party-Perfect Presentation and Variations
Once your Chocolate Pudding Dirt Cups are decorated, it’s all about presentation! Arrange them on black or orange trays lined with faux cobwebs and tiny plastic spiders for extra creepiness. Mini pumpkins or Halloween confetti add festive touches.
For gatherings, make mini Dirt Pudding “Graveyard” Cups in shot glasses or condiment cups—bite-sized versions that are easy to grab and go. Create low-sugar or dairy-free options using light whipped topping and plant-based pudding. Everything stays creamy and delicious, no matter your preference.
Short on time? Prep your pudding, cream layer, and cookie crumbs the day before. At party time, set up a “build-your-own graveyard” station for kids. They’ll have a blast customizing their own creations. For display, add a few cups to tiered trays surrounded by toy tombstones or LED candles to create a haunting centerpiece. However you serve them, these Easy Dirt Pudding Cups bring together sweetness, creativity, and Halloween spirit in every spooky bite.
FAQ and Conclusion
FAQ
1. How far in advance can I make Dirt Pudding Cups?
You can prepare Dirt Pudding “Graveyard” Cups up to one day before serving. Keep them covered in the refrigerator and add cookie tombstones or candy toppings just before serving to keep everything fresh.
2. Can I make these Halloween Dirt Cups without cream cheese?
Yes! Simply skip the cream cheese layer and add more pudding or whipped topping. You can also use dairy-free alternatives. This tweak keeps your Halloween Dirt Cups for Kids creamy and delicious.
3. What’s the best way to crush Oreos for Dirt Pudding Recipe?
Place cookies in a resealable bag and roll over them with a rolling pin until you reach your desired crumb size. A food processor works for fine crumbs. Kids love helping with this step—it makes them feel like part of the creative process!
4. How can I store leftover Dirt Pudding “Graveyard” Cups?
Cover each cup tightly with plastic wrap or use airtight containers. Store in the fridge for up to three days. If the top looks soft, sprinkle fresh cookie crumbs for a revived look before serving again.
5. Can I use instant pudding for this recipe?
Yes! Instant pudding is ideal for this Easy Dirt Pudding Recipe since it sets quickly. Just follow the package directions for mixing and chilling, and you’re ready to layer and decorate.
Conclusion
Dirt Pudding “Graveyard” Cups are more than just a dessert—they’re a family tradition wrapped in chocolate and creativity. With an easy-to-follow Dirt Pudding Recipe, you can turn simple ingredients into whimsical Halloween memories. The layers of creamy pudding, crunchy cookies, and spooky garnishes make every cup a fun edible masterpiece.
Gather your kids, queue up some spooky tunes, and let everyone craft their own mini graveyards. These Pudding Dirt Cups are quick, fun, and endlessly customizable—from classic gummy worm cups to full-fledged Halloween dessert displays.
Unleash your imagination, share your unique versions, and let Chocolate Pudding Dirt Cups become the highlight of your Halloween celebration. With just a few easy steps, you’ll bring the spooky spirit of the season straight into your kitchen—one deliciously eerie spoonful at a time.