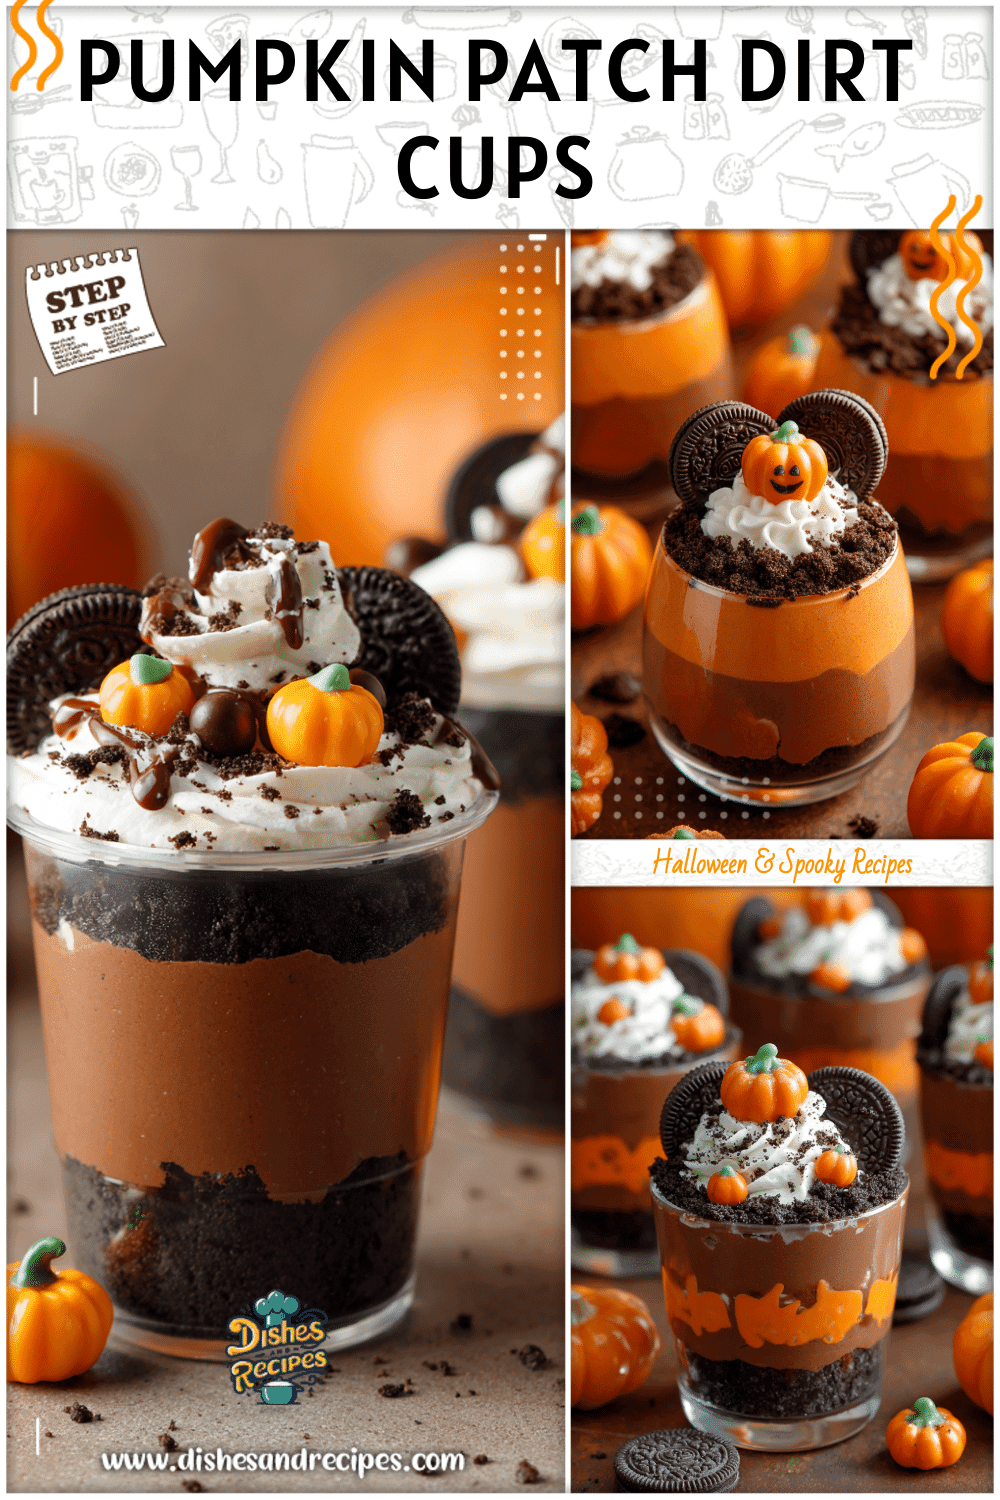
Get ready to dig into some spooky fun with these incredibly easy Graveyard Dirt Cups! Perfect for Halloween parties, school treats, or just a fun family activity, these dessert cups combine rich brownie crumbles with creamy chocolate pudding for a treat that’s as delicious as it is delightfully eerie.

These graveyard dirt cups are a classic for a reason – they’re simple to assemble, require no baking (beyond the brownies, if you choose to make them from scratch, but store-bought works perfectly!), and offer a fantastic canvas for creative Halloween decorations. Whether you’re a seasoned baker or a kitchen novice, you’ll find this recipe straightforward and satisfying.
Table of Contents
- What You’ll Love About This Quick And Easy Recipe
- Everything You Need To Make This Recipe Without Stress
- Time Needed From Start To Finish
- How To Make It Step By Step With Visual Cues
- Easy Variations And Serving Ideas That Fit Real Life
- Common Slip-Ups And How To Avoid Them
- How To Store It And Make It Ahead Without Ruining Texture

Graveyard Dirt Cups
- Total Time: 50 minutes
- Yield: 12 servings 1x
Description
Dig into spooky fun with these incredibly easy Graveyard Dirt Cups! Perfect for Halloween parties, school treats, or just a fun family activity, these dessert cups combine rich brownie crumbles with creamy chocolate pudding for a treat that’s as delicious as it is delightfully eerie.
Ingredients
Instructions
1. Prepare the Brownie Crumbles: If using a fresh batch of brownies, ensure they are completely cooled. Once cool, crumble the brownies into small, irregular pieces. You want them to resemble loose soil, so don’t be afraid to break them down with your hands or a fork. Set aside about half a cup of the crumbles for later.
2. Make the Chocolate Pudding: In a large mixing bowl, whisk together the instant chocolate pudding mix and cold milk for about 2 minutes, or until the mixture begins to thicken. It will still be a bit loose, but it should be noticeably thicker than milk.
3. Fold in Whipped Topping: Gently fold the thawed whipped topping into the prepared chocolate pudding. Mix until just combined and no streaks of white whipped topping remain. Be careful not to overmix, as this can deflate the whipped topping and make the pudding less airy.
4. Crush the Oreo Cookies: Place the Oreo cookies in a large zip-top bag and crush them finely using a rolling pin, or pulse them in a food processor until they resemble fine dirt. You want a consistent, sandy texture.
5. Assemble the Cups: Begin by placing a layer of about 2 tablespoons of crumbled brownies at the bottom of each clear plastic cup or glass jar. This forms the first “dirt” layer.
6. Add Pudding and Oreo Layers: Spoon about 1/4 to 1/3 cup of the chocolate pudding mixture over the brownie layer in each cup. Then, sprinkle a generous layer of the crushed Oreo cookies over the pudding. Repeat these layers (brownie, pudding, Oreo) until the cups are nearly full, ending with a final layer of crushed Oreos on top to create the “graveyard dirt” effect.
7. Chill and Decorate: Place the assembled dirt cups in the refrigerator for at least 30 minutes to allow the pudding to set and the flavors to meld. While they chill, prepare your gravestones by writing “RIP” or other spooky messages on the Milano cookies with black icing gel or an edible marker. Once chilled, insert a Milano cookie gravestone into the top of each cup. Arrange gummy worms so they look like they are crawling out of the “dirt,” and add any other Halloween candies like candy pumpkins or candy corn for extra festive flair.
- Prep Time: 20 minutes
- Cook Time: 0 minutes
- Category: dessert
- Method: no-bake
- Cuisine: american
Nutrition
- Serving Size: 1 cup
Keywords: halloween, dirt cups, pudding, brownie, oreo, kid-friendly, easy, no-bake, party food, spooky
What You’ll Love About This Quick And Easy Recipe
This recipe is an absolute winner for anyone looking to whip up a festive Halloween treat without spending hours in the kitchen. It’s perfect for busy parents, college students, or anyone hosting a spooky gathering who wants a high-impact dessert with minimal effort. The combination of fudgy brownie and smooth, rich pudding is universally loved, making it a guaranteed crowd-pleaser for all ages. Kids especially adore the “dirt” aspect and the fun of decorating their own graveyard scene. You can serve these at a Halloween potluck, as a special after-school snack, or as a centerpiece dessert for your October celebrations. It’s a no-fuss, high-fun dessert that delivers on both taste and festive spirit.
Everything You Need To Make This Recipe Without Stress
Gathering your ingredients for these graveyard dirt cups is incredibly simple, with most items being readily available at any grocery store. The beauty of this recipe lies in its simplicity and the ability to use pre-made components to save time, making it truly stress-free.
INGREDIENTS:

- 1 (13×9-inch) pan prepared brownies, cooled and crumbled (store-bought or homemade)
- 2 (3.9-ounce) packages instant chocolate pudding mix
- 4 cups cold milk (dairy or non-dairy alternative)
- 1 (8-ounce) container frozen whipped topping, thawed
- 1 (15-ounce) package Oreo cookies, finely crushed (about 3 cups)
- Gummy worms or other gummy candies
- Milano cookies or similar rectangular cookies (for gravestones)
- Black icing gel or edible marker (for writing on gravestones)
- Optional: Candy pumpkins, candy corn, or other Halloween-themed candies for decoration
- Clear plastic cups or small glass jars (6-8 ounces each)
For the brownies, using a store-bought mix or pre-baked brownies is a fantastic shortcut. If you prefer to bake from scratch, any fudgy brownie recipe will work beautifully. When it comes to the milk, whole milk will give you the creamiest pudding, but 2% or even a non-dairy milk like almond or soy milk can be used, though the texture might be slightly less rich. For the whipped topping, a store-brand frozen whipped topping works just as well as a name brand. And for the “dirt,” classic Oreos are ideal, but any chocolate sandwich cookie can be substituted. Just make sure they are finely crushed to resemble soil.
Time Needed From Start To Finish
The beauty of these Graveyard Dirt Cups is how quickly they come together, especially if you’re using pre-made brownies.
- Preparation Time: 20 minutes
- Chill Time: 30 minutes (minimum, for pudding to set)
- Total Time: Approximately 50 minutes
This timing assumes your brownies are already cooled and crumbled. If you need to bake and cool brownies from scratch, that will add an additional 45-60 minutes to the overall process. The chill time is crucial for the pudding to firm up and for the layers to meld together, creating that delightful texture.
How To Make It Step By Step With Visual Cues

Creating these spooky graveyard dirt cups is a fun and straightforward process. Follow these steps for perfect results every time.
- Prepare the Brownie Crumbles: If using a fresh batch of brownies, ensure they are completely cooled. Once cool, crumble the brownies into small, irregular pieces. You want them to resemble loose soil, so don’t be afraid to break them down with your hands or a fork. Set aside about half a cup of the crumbles for later.
- Make the Chocolate Pudding: In a large mixing bowl, whisk together the instant chocolate pudding mix and cold milk for about 2 minutes, or until the mixture begins to thicken. It will still be a bit loose, but it should be noticeably thicker than milk.
- Fold in Whipped Topping: Gently fold the thawed whipped topping into the prepared chocolate pudding. Mix until just combined and no streaks of white whipped topping remain. Be careful not to overmix, as this can deflate the whipped topping and make the pudding less airy.
- Crush the Oreo Cookies: Place the Oreo cookies in a large zip-top bag and crush them finely using a rolling pin, or pulse them in a food processor until they resemble fine dirt. You want a consistent, sandy texture.
- Assemble the Cups: Begin by placing a layer of about 2 tablespoons of crumbled brownies at the bottom of each clear plastic cup or glass jar. This forms the first “dirt” layer.
- Add Pudding and Oreo Layers: Spoon about 1/4 to 1/3 cup of the chocolate pudding mixture over the brownie layer in each cup. Then, sprinkle a generous layer of the crushed Oreo cookies over the pudding. Repeat these layers (brownie, pudding, Oreo) until the cups are nearly full, ending with a final layer of crushed Oreos on top to create the “graveyard dirt” effect.
- Chill and Decorate: Place the assembled dirt cups in the refrigerator for at least 30 minutes to allow the pudding to set and the flavors to meld. While they chill, prepare your gravestones by writing “RIP” or other spooky messages on the Milano cookies with black icing gel or an edible marker. Once chilled, insert a Milano cookie gravestone into the top of each cup. Arrange gummy worms so they look like they are crawling out of the “dirt,” and add any other Halloween candies like candy pumpkins or candy corn for extra festive flair.
Easy Variations And Serving Ideas That Fit Real Life
These graveyard dirt cups are incredibly versatile, making them easy to adapt for different tastes or occasions. For a fun twist, you could try using different pudding flavors like vanilla, white chocolate, or even a combination of chocolate and vanilla for a “marbled” dirt effect. Instead of brownies, consider using chocolate cake crumbles or even chocolate graham cracker crumbs for a slightly different texture.
To make them even more kid-friendly, set up a “decoration station” where children can choose their own gummy worms, candy pumpkins, candy corn, or even small plastic spiders to adorn their dirt cups. This makes it an interactive activity as well as a dessert. For serving at a party, arrange the finished cups on a large platter covered with a dark tablecloth for a dramatic effect, perhaps with some faux spiderwebs or plastic spiders scattered around. You can also make these in a large trifle dish for a communal dessert, layering everything as you would in individual cups, then decorating the top.
Common Slip-Ups And How To Avoid Them
Even simple recipes can have small pitfalls. Here are a few common mistakes to watch out for when making your graveyard dirt cups:
- Not Chilling the Pudding Enough: The most common mistake is not allowing enough time for the pudding to set. If you try to assemble too quickly, the pudding will be too runny, and your layers won’t hold their shape, resulting in a messy cup. Always give the pudding at least 30 minutes in the fridge to firm up before layering.
- Overmixing the Whipped Topping: When folding the whipped topping into the pudding, be gentle. Overmixing can cause the whipped topping to lose its airiness, leading to a denser, less creamy pudding mixture. Fold until just combined.
- Not Crushing Oreos Finely Enough: For the best “dirt” effect, the Oreos need to be finely crushed. Large chunks won’t look as realistic and can make the texture inconsistent. Use a food processor for the quickest and finest results, or a rolling pin and a sturdy bag.
- Using Warm Brownies: If your brownies are still warm when you crumble them and add them to the cups, they can melt the pudding and whipped topping, creating a soupy mess. Always ensure your brownies are completely cooled before assembly.
- Decorating Too Early: While it’s tempting to decorate right away, waiting until just before serving (or at least after the chill time) prevents gummy candies from becoming hard or melting into the pudding, and ensures your gravestones stand upright.
How To Store It And Make It Ahead Without Ruining Texture
These spooky graveyard dirt cups are fantastic for making ahead, which is a huge plus for party planning.
Making Ahead: You can assemble the cups completely, including the brownie, pudding, and Oreo layers, up to 24 hours in advance. Cover each cup tightly with plastic wrap and store them in the refrigerator. Wait to add the gummy worms, gravestone cookies, and any other delicate candy decorations until just before serving. This prevents the cookies from getting soggy and the gummies from hardening or melting.
Storage: Leftover dirt cups

FAQs
- Can I make these ahead? Yes—prep ahead, refrigerate, then serve when ready.
- How long do leftovers last? Store covered in the fridge for 3–4 days for best texture.
- Can I adjust sweetness? Yes—add more or less sweetener to taste.
- Can I change the fruit? Yes—swap strawberries for blueberries, raspberries, or sliced banana.