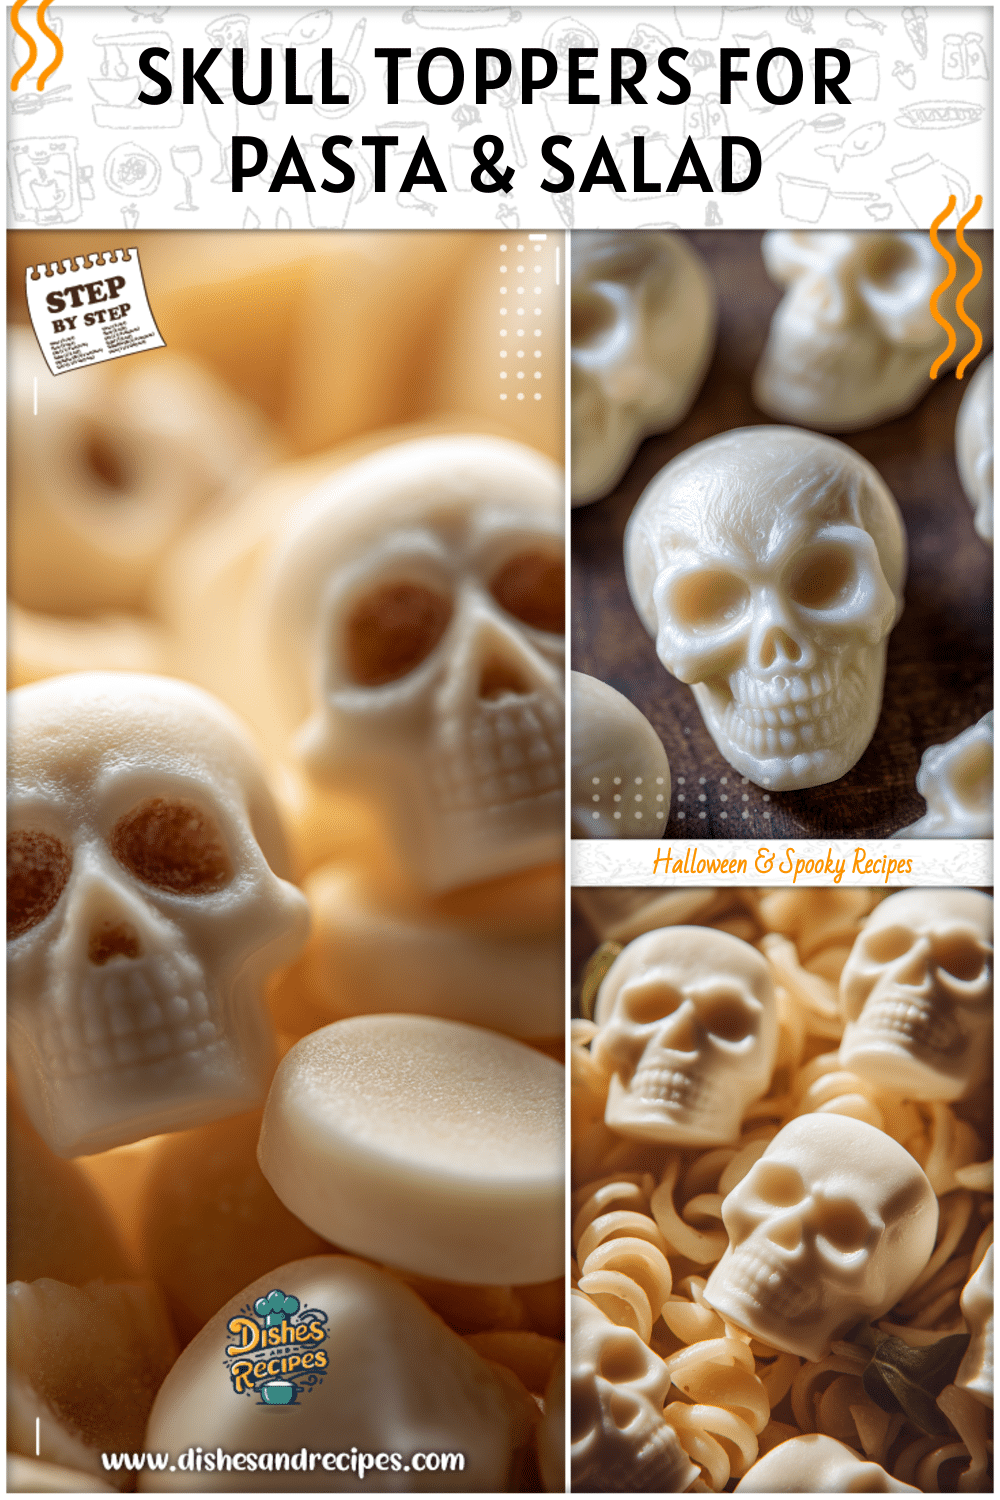
Halloween is the holiday when food gets a delightful little makeover. It’s the one time of year when appetizers, main courses, and even desserts are allowed to look spooky, silly, or downright eerie—without losing their delicious flavor. That’s where mozzarella skulls come in. These creepy yet charming cheese toppers have quickly become a favorite addition to Halloween pasta dishes and festive salads, adding just the right amount of spooky flair. Whether you’re hosting a big costume party or a cozy family dinner, Halloween themed food like mozzarella skulls transforms an ordinary recipe into something eye-catching and unforgettable.
In this article, we’ll walk through the story of how mozzarella skulls became a fun food tradition, show you how to make them step by step, share tasty ways to serve them with pasta and salads, and answer the most common questions about these cheesy little skulls. So grab your molds, a good block of mozzarella, and let’s get spooky in the kitchen!
The first time I made mozzarella skulls was almost by accident. I had picked up a silicone skull mold for candies, thinking I’d use it for chocolates or gummies. On Halloween night, while boiling spaghetti for a quick family dinner, inspiration struck—what if those skull molds could take our pasta from ordinary to terrifyingly fun? I melted down some mozzarella, pressed it into the molds, and waited to see how they’d turn out.
Print
Halloween Mozzarella Skulls: Scary-Cute Pasta & Salad Toppers
- Total Time: 30 minutes
- Yield: Serves 4
Description
Creepy yet delicious mozzarella skulls pressed into silicone molds and used as spooky toppings for Halloween pasta dishes and salads. Easy to make, fun to serve, and sure to impress guests of all ages.
Ingredients
Instructions
1. Lightly coat silicone molds with olive oil or nonstick spray.
2. In a small saucepan over low heat, melt mozzarella cubes, stirring until smooth. Add salt if desired.
3. Quickly spoon melted cheese into each skull mold, pressing into corners for detail.
4. Refrigerate molds for 20–30 minutes (or freeze for 10 minutes) until cheese firms.
5. Gently flex molds to unmold mozzarella skulls and set aside.
6. Cook pasta according to package instructions; drain and return to pot.
7. Warm marinara sauce and toss with cooked pasta; transfer to serving bowls.
8. Top each bowl of pasta with 2–3 mozzarella skulls just before serving.
9. For salads, toss greens and optional veggies with dressing and place 1–2 skulls on top of each portion.
- Prep Time: 15 minutes
- Cook Time: 15 minutes
Nutrition
- Calories: 250
- Sodium: 400
- Fat: 15
- Carbohydrates: 10
- Protein: 12
When the cheese set and I popped the first skull out, I couldn’t help but laugh. The creamy white mozzarella captured every little bone-like detail, making it look like a miniature skull straight from a haunted kitchen. I floated a few of them onto bowls of marinara-covered pasta, and suddenly the kids were squealing with excitement. The glow of candlelight on the table mixed with the pale skull shapes made dinner feel like more of an experience than just a meal. From that moment on, mozzarella skulls became a part of our Halloween tradition—whether on top of bubbling pasta or scattered across a colorful salad.
The best part wasn’t just how fun they looked, but how delicious and familiar they tasted as well—melty, slightly salty, and perfect against hearty sauces or crisp vegetables. Every bite combined a little spooky theatrics with the comfort of cheese. And just like that, mozzarella skulls earned their permanent place in our Halloween kitchen lineup.
Why spooky food makes Halloween dinner unforgettable
Halloween is about more than just costumes and candy. It’s a sensory holiday—full of sights, textures, and flavors that transport us into the playful side of the season. That’s why Halloween themed food has so much power. A simple bowl of noodles can transform into Halloween pasta when topped with mozzarella skulls, creating a dish that sparks joy, laughter, and maybe a little shiver.
Spooky food traditions like this add layers of fun to a holiday meal. Mozzarella skulls on pasta feel like edible décor, while adding them to salads turns an everyday dish into something festive. Food that looks eerie but tastes great appeals to kids and adults alike, bridging the gap between playful presentation and satisfying flavor. When your guests or family sit down to see skull-shaped cheese floating in a marinara “blood-red” sauce, it sets the tone for the entire evening—silly, spooky, and unforgettable.
The beauty of mozzarella skulls lies in their simplicity. They don’t require hours of preparation, expensive ingredients, or professional cooking skills. Instead, they prove that with just a few creative touches, Halloween themed food can become the centerpiece of your holiday dinner. Whether you’re serving up a bubbling skillet of Halloween pasta or tossing together a salad for balance, mozzarella skulls are the kind of little surprise that makes people smile and ensures the meal is remembered long after the Halloween decorations are packed away.
Halloween Mozzarella Skulls Recipe
Ingredients you’ll need for mozzarella skull toppers
- 2 cups fresh mozzarella cheese (low-moisture mozzarella works best for molding)
- A pinch of salt (optional, depending on your cheese choice)
- Skull-shaped silicone molds (available online, at baking supply stores, or during Halloween season in party shops)
For serving with pasta or salad (optional, but recommended):
- Cooked pasta of your choice (consider linguine, spaghetti, or even black squid ink pasta for extra Halloween vibes)
- Salad greens such as baby spinach, kale, or mixed lettuce
- Seasonal add-ins like roasted pumpkin cubes, cherry tomatoes, or julienned carrots for color contrast
- Your favorite sauces or dressings (marinara, Alfredo, Caesar, vinaigrette, etc.)
Where to buy molds: Skull molds are easiest to find online (search for food-safe silicone Halloween molds). Opt for medium-size cavities to make a visible impact when topping pasta or salads. A sturdy, flexible silicone mold ensures easy unmolding and cleaner details on your cheese skulls.
Best cheese brands for molding: Choose mozzarella that melts smoothly but still resets when cooled. Pre-shredded cheese often contains anti-caking agents that can interfere with molding, so a fresh block of mozzarella is your best bet. Brands like Galbani or BelGioioso are excellent choices.
Step-by-step method to make spooky mozzarella skulls
- Prepare your molds: Lightly spray your silicone molds with nonstick cooking spray or brush with a thin coat of olive oil.
- Melt the mozzarella: Cut mozzarella into cubes and melt on low heat, stirring until smooth. Add a tablespoon of warm water if it stiffens too quickly.
- Fill the molds: Press melted mozzarella carefully into each cavity. Smooth into corners for sharp details.
- Set the molds: Refrigerate 20–30 minutes (or freeze for 10) until firm.
- Unmold gently: Flex the silicone mold and pop skulls out carefully.
Pro tips:
- Chill longer if cheese sticks.
- Melt and mold in small batches to avoid cheese firming too fast.
- Press with a spoon to remove air gaps.
- Add skulls to pasta right before serving so they hold their shape.
Creative Ways to Use Mozzarella Skulls at a Halloween Dinner
Halloween pasta topped with mozzarella skulls
Few things say spooky dinner quite like a bubbling pot of Halloween pasta. Once you’ve whipped up your mozzarella skulls, the fun part is deciding how to display them against different sauces and pasta types.
- Black squid ink pasta: Dark noodles contrast perfectly against white skulls, creating an eerie effect.
- Pumpkin Alfredo: Creamy orange tones give a cozy yet festive look that makes skulls seem like they’re floating.
- Classic marinara: Red sauce creates a gory backdrop for skulls—always a hit with kids.
Serve pasta in bowls or a communal dish, topping with skulls just before serving. Fresh basil or roasted garlic add dramatic garnishes. For party fun, let guests add their own skull toppers as edible décor.
Chillingly cute salad bowls with mozzarella toppers
Salads can be festive too. Adding mozzarella skulls makes even light dishes playful:
- Caesar salad: Subtle skull garnishes mix in with croutons for a surprise bite.
- Dark leafy greens: Spinach or kale make skulls practically glow against the dark background.
- Colorful mixes: Orange carrots, red tomatoes, and purple cabbage contrast beautifully.
Serve in bowls or mini cauldrons for extra Halloween effect, topping with skulls chilled straight from the fridge for the best look and texture.
FAQs and Conclusion
FAQs about Halloween mozzarella skulls
Can I make mozzarella skulls ahead of time?
Yes! Prepare up to 24 hours ahead and keep refrigerated in an airtight container. Use parchment if stacking.
Will mozzarella hold its shape on hot pasta?
Skulls will soften, so place them just before serving to maintain detail for the big reveal.
What are alternatives to mozzarella for skull molds?
Provolone, Monterey Jack, or dairy-free cheese alternatives can also be used for molding.
How do I keep skulls from melting too fast?
Serve chilled and place onto slightly cooled pasta or salads. This preserves their eerie shape longer.
Final thoughts on adding skulls to Halloween themed food
Halloween is about creating memories with imagination—and food is central to that. Mozzarella skulls show how simple cheese can transform dishes into something festive. From eerie Halloween pasta bowls to colorful salads, spooky cheese toppers are easy, adaptable, and fun for everyone at the table.
So this Halloween, move beyond candy and try crafting mozzarella skulls as your new food tradition. They’ll surprise guests, delight kids, and guarantee your dinner becomes part of holiday fun. Grab your mold, melt that mozzarella, and let the spooky kitchen magic begin!


