Halloween is all about spooky fun, creative costumes, and of course—delicious treats! If you’re looking for a festive, kid-friendly dessert, these spooky fall dirt cups are the perfect Halloween desserts in a cup. Not only are they super easy to make, but they’re also ideal for school parties and classroom celebrations where mess-free, single-serve options are a lifesaver.
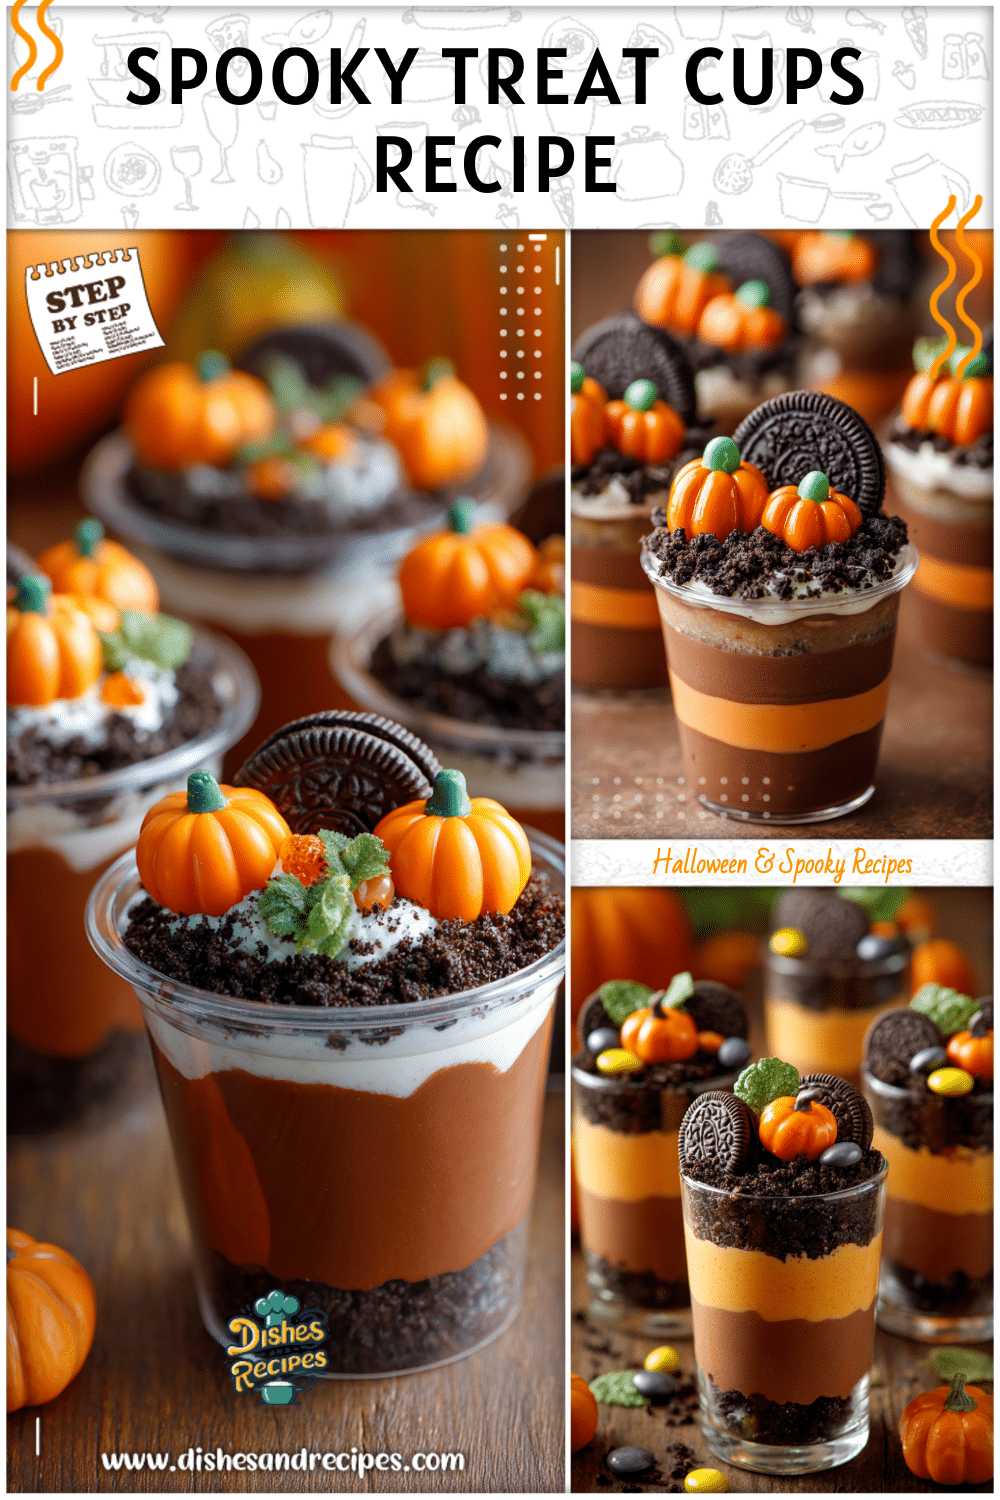
With layers of creamy pudding, crunchy cookie crumbs, and cute candy toppers, these dirt cups double as both a sweet treat and a fun table centerpiece. Get ready to wow kids, teachers, and parents alike with this playful twist on classic Halloween party food.
The Heart of Homemade Halloween Treats
A Childhood Memory with Halloween Dirt Cups
One of the earliest memories many of us have of Halloween at school isn’t just parading through the classroom in costumes, but spotting a table full of colorful, themed desserts. I vividly remember walking into my third-grade classroom to see a lineup of little clear plastic cups, each filled with layers of chocolate pudding and crushed cookies. At first glance, they looked like cups of “dirt,” but topped with bright orange candy pumpkins and wiggly gummy worms, they were absolutely irresistible.
That first bite of soft pudding layered with crunchy crumbs instantly became a tradition. The simplicity of the ingredients—pudding mix, cookies, and candy—made it something any parent could whip up easily. Teachers loved them too because they were portable, individual portions that required no cutting or scooping. And kids? We couldn’t get enough of them. Halloween dirt cups truly hit that sweet spot where festive meets fun.
That’s the beauty of spooky fall dirt cups: they’re timeless. Even today, they remain a favorite for classrooms and family gatherings, because they’re just as entertaining to assemble as they are to eat. Parents can involve their children in the layering process, teachers can rely on them as stress-free classroom desserts, and party organizers know they’ll disappear off the table in no time.
Print
Spooky Fall Dirt Cups
- Total Time: 20 minutes
- Yield: 12 cups 1x
Description
Kid-friendly Halloween desserts in a cup with chocolate pudding, cookie “dirt,” and candy toppers—perfect for mess-free school parties.
Ingredients
Instructions
1. Whisk pudding mix with cold milk for 2 minutes; let stand 5 minutes to thicken.
2. Fold in whipped topping until smooth and fluffy.
3. Crush cookies in a zip-top bag with a rolling pin to make coarse crumbs.
4. Spoon 1 tablespoon crumbs into each cup, add pudding, then more crumbs; repeat to 2/3 full.
5. Top each cup with candy pumpkins or gummy worms.
6. Serve immediately or chill up to 24 hours; add candy just before serving for best texture.
- Prep Time: 15 minutes
- Cook Time: 0 minutes
Nutrition
- Calories: 270 kcal
- Sodium: 220 mg
- Fat: 10 g
- Carbohydrates: 41 g
- Protein: 4 g
Why These Treats Always Stand Out at School Parties
There’s a reason these simple desserts in a cup are still one of the most popular Halloween party foods decades later. First, the visual effect is unbeatable—clear cups show off the delicious layers of chocolate pudding “mud” and crushed cookie “dirt,” creating the perfect backdrop for gummy worms, candy bones, or pumpkin candies on top. The presentation is half the fun, instantly transforming an ordinary pudding cup into a playful, spooky fall treat.
Second, they’re wonderfully practical. Because they’re single-serve, there’s no need for extra plates, knives, or cutting. Kids can grab their own Halloween dirt cup, enjoy it without making a mess, and head back to their festive activities. Parents appreciate how budget-friendly they are, and teachers love how smoothly they fit into the sometimes-chaotic flow of class parties.
Whether you’re hosting a trick-or-treat night, a classroom Halloween bash, or a cozy family get-together, these dirt cups stand out as both a festive decoration and a crowd-pleasing dessert. They’re fun, delicious, and endlessly customizable, making them the ultimate go-to Halloween dessert in a cup.
Recipe Ingredients & What You Need
Halloween Dirt Cups Made Simple
When it comes to creating the perfect Halloween dirt cups for classroom parties, simpler is always better. These desserts in a cup don’t require fancy baking techniques or complicated shopping lists—you probably already have most of the ingredients in your pantry. That’s part of the magic: spooky fall dirt cups are low-effort but have maximum impact, making them ideal for busy parents and teachers planning a Halloween party on a budget.
All the Ingredients for Spooky Fall Dirt Cups
| Ingredient | Why It’s Needed | Notes & Variations |
|---|---|---|
| Instant pudding mix (chocolate) | The base “mud” layer | Vanilla pudding dyed orange with food coloring makes a fun alternative. |
| Milk | To prepare the pudding | Use dairy-free milk for allergy-friendly dirt cups. |
| Crushed chocolate sandwich cookies | To mimic “dirt” | Kids can help crush them; gluten-free cookies also work. |
| Whipped topping | Adds creaminess and stability | Coconut whipped cream is a non-dairy swap. |
| Candy pumpkins or candy corn | For spooky toppers | Swap with gummy worms or candy bones depending on theme. |
| Clear plastic cups | Show off the spooky layers | 8-ounce cups are perfect for kids’ portions. |
Tools and Supplies Checklist
- Mixing bowls – one for pudding and one for crushed cookies.
- Whisk or electric mixer – to quickly prepare the pudding mix.
- Ziploc bags – the easiest (and most fun) way for kids to crush cookies into crumbs. Just seal and smash!
- Measuring cups & spoons – to keep the ingredients balanced.
- Plastic spoons – for layering pudding and crumbs neatly into cups.
- Clear plastic cups (8 oz) – these let everyone see the delicious “layers of dirt” and keep servings neat.
This is also what makes the recipe so kid-friendly. Children can whisk the pudding, crush cookies in a bag, and help assemble their spooky creations. Teachers often love this recipe for classroom activities because it doubles as both a hands-on Halloween craft and a tasty treat.
By keeping the ingredients pantry-friendly and the tools simple, these Halloween desserts in a cup are accessible to everyone. Whether you’re preparing them for a big school party or just a few for a family movie night, everything you need can be pulled together quickly without stress. That means more time to enjoy the fun and less time worrying about complicated recipes.
How to Make Halloween Dirt Cups
Step-By-Step Method for School Parties
- Prepare the pudding base
Whisk instant chocolate pudding mix with milk. Let it chill for about 5 minutes until slightly firm. - Crush the cookies into dirt
Place cookies inside a Ziploc bag and crush into crumbs with hands or a rolling pin. - Layer the cups
Add crushed cookies to the bottom of clear cups, then pudding, then more cookies. Repeat until two-thirds full. - Top with candy decorations
Add candy pumpkins, gummy worms, or candy bones. Let kids customize for fun. - Serve or store
Enjoy right away or refrigerate until serving. Great for making the night before.
Bulk-Making Tip: For school parties, create an assembly line to speed things up and keep it organized.
Variations and Creative Ideas for Dirt Cups
- Pumpkin Patch Cups – Use orange-colored vanilla pudding, top with crumbs, and add candy pumpkins in rows.
- Graveyard Cups – Add cookie “tombstones” with icing letters into the crumbs.
- Wiggly Worm Dirt Cups – Place gummy worms so they look like they’re emerging from the dirt.
- Allergy-Friendly Options – Gluten-free cookies, dairy-free pudding, and coconut whipped cream for inclusivity.
- Party-Themed Flavors – Try cookies-and-cream pudding, butterscotch with sprinkles, or mint pudding for “monster slime.”
These Halloween dirt cups not only serve as delightful trick-or-treat food but also double as festive table decorations, making them a multi-purpose crowd-pleaser.
FAQ + Conclusion
Frequently Asked Questions About Spooky Fall Dirt Cups
Can I make dirt cups the night before?
Yes, assemble ahead and refrigerate. Add candy toppings before serving.
How long do dirt cups last in the fridge?
They stay fresh 1–2 days if covered airtight. Beyond that, crumbs may soften too much.
What are allergy-friendly substitutions for dairy or gluten?
Use non-dairy milk, gluten-free cookies, and coconut whipped topping.
Can kids help make these Halloween dirt cups?
Yes! Kids love crushing cookies, stirring pudding, and decorating.
What clear cup size works best for school parties?
Eight-ounce cups are kid-perfect. For preschoolers, use 5-ounce as minis.
Conclusion
Your guide to the easiest, most festive spooky fall dirt cups is complete! These Halloween desserts in a cup are budget-friendly, kid-approved, and mess-free. Fun to customize and quick to prepare, they’re perfect for parties or trick-or-treat gatherings.
Whip up a batch, let kids get creative with toppings, and watch these charming, playful treats disappear. Halloween magic—in every cup!

